Friday, August 31, 2007

Basic Marker Tutorial part 1a

I decided to try giving my first online tutorial. It was not easy because so much of the stuff is just easier to show in person! Since I have had a lot of comments on my water coloring, I decided to start there. I'm almost embarrassed about how easy it is. Marker water coloring is not water coloring in the true sense of the word! You use some of the same techniques, but that's about it. It is easy for anyone to learn, and the results are instant and dramatic!


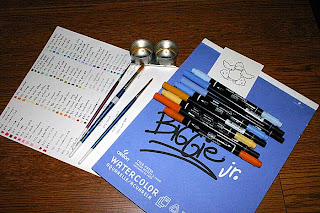
I decided to choose a simple image for part 1. A little later down the road, I will do a part 2 with a more complex image and background. As you can see, you need a decent watercolor paper, I use Biggie Jr. by Canson. It is cheap, 50 pg. for 10.00 dollars and I purchase it at my not so local fine art store. Not all watercolor papers are created equal in the case of marker watercolors. Some papers have the ink soak in too fast making it impossible to move the color! The second item you need is water based markers. I use Tombow and Stampin'Up! markers which are excellent quality and highly pigmented. Again bold color gives you bold results, and though expensive, these markers are worth it! Finally you need some good brushes and water resistant ink! I use artist quality sable brushes. These are mine from when I did watercolor. They are 20 years old and still going strong. I use small rounded brushes up to large rounded brushes, each one sized for different job's. I also use flat blunt tipped brushes for doing the occasional washes. Last my ink is Memories dye ink pad which resists smearing with water. I have Staz-on but use it rarely due to the habit it has of staining my rubber. In the picture you will also see a chart I have made with a scribble and a name and number of each marker that I own. This makes it easy for me to find the right color, The cap rarely gives a true representation of the color.

Before I start my initial coloring, I look at the image and try to determine what colors I will need. I usually choose 3 colors in each needed value. For instance the beak, I will use A light, a medium and a dark. I chose for this a pale yellow, medium orange, and a orange/red . All colors which are used to form each other.
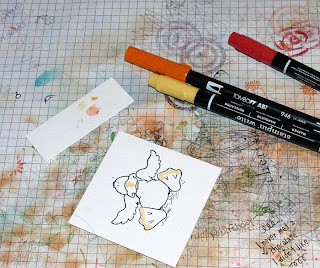
I start by working in sections. It is often advisable when you start to do small sections at a time. This is because you may be more hesitant and take more time letting the ink on other sections sink in and become less movable. I start by laying down the lightest color in a scribble in the areas I think should stay lighter. You can also leave these areas blank to allow a thin wash of your darker color to cover.
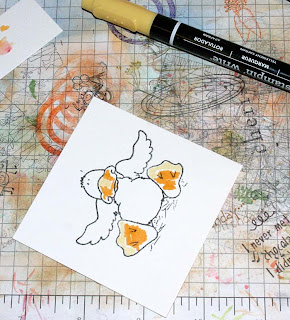
I add in my middle color, following the contours and areas I think should be shaded.
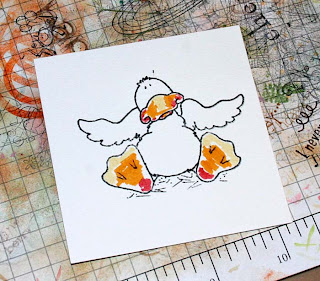
Last I add my darkest color. It is now ready to blend. Because the area is small I will choose a small brush for the area. I make sure the brush is not so wet that it drips, but not so dry that the bristles become separated. I usually use the back of my hand to determine the wetness.
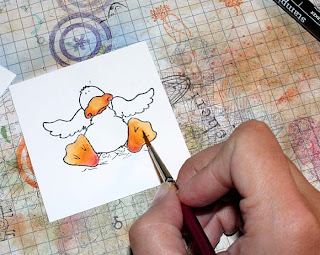


I work in a circular motion to get good blending. The circles I use are tight and controlled. My brush is held at approximately 45 degree angle. I hold lower down for control. I start in the light area, move down to the dark area, move back up to the medium area then clean off my brush so as not to darken my light value to much. I then take my clean brush and clean up the line between the medium and the light. Any mistakes can be fixed by adding a drop of water to the offending area, and soaking it up with a rag or Kleenex.

Basic Marker Tutorial 1b

I then move on to the next part of the image. The duck is white, but the white will need shadow to give it dimension. I decide on some blue-violet. I follow all the areas that I think should have shadow, that means creases of wing, under the chin, where he sits, the belly lines. All of this will make him look more real. I use only 2 blues, a light and a dark, relying on my white to blend into the lightest color. The darkest areas are of course those closest to the areas casting the shadow.
I blend it in with water, starting with the lightest to the darkest, back to the lightest and then cleaning my brush to blend the lightest into the white.
Last I need to do the hay. I pick colors which best represent hay, Yellows and Ochres. Darkest under the duck and out to the lightest. I use quick strokes or scribbles, I try to keep it loose and flowing.
After it is blended according to my earlier method I consider him ready to use. At this point I would either cut him out, or I would continue on to make a background. I will get more into that on part 2 of this tutorial.
Finally I photographed my method for organizing my watercolor markers. They are arranged in six color groups: earth tones, Yellow/oranges, greens, blues, violets, and red/pinks. It's not perfect but then I also have my chart to rely on to easily find the colors I want! I hope this helps out and shows you how easy this stunning technique is!


Recipe:

Stamps: High Hopes Rubber Stamps

Ink : Memories Dye Ink

Markers: Tombow: 553,946,026. Stampin'Up! Barely Banana, Ballet Blue, Ruby Red, So Saffron, More Mustard.

Wednesday, August 29, 2007

Sketch Challenge 139

I did two cards today. The first was actually the poppy card and the second was the cherry card. The poppy did not quite follow the sketch properly which is why I did the second card, which is also not perfect to the sketch. The recipe to the cherry card is here It actually looks a lot better in person. There is spica red glitter pen outlining the cherries in the bowl and then crystal effects is placed on top. They look shiny and delicious. The stems of the larger cherry is also outlined with the Spica glitter pens. These pens are amazing, so much better than the Sakura! The little cherries are painted in with Twinkling H2O's to give them a nice shimmer. The poppy card recipe is here . It is also painted with Twinkling H2O's over Copic markers. It is a distressed card and fairly simple. Anyway, I'm going to bed and I hope you all have a great night!


Tuesday, August 28, 2007

Color challenge 129 tweaked


I'm sick with the most irritating cold, I'm trying to get ready for a craft fair, as well as two up-coming library classes, and I decided I needed to take a break and do something fun. Have you ever tried to make a card and it turned out totally different then what you envisioned? That's what I had with this one. I started with the teapot and wanted to use it with the color challenge. Well I did a background with Winter Roses and it turned out to bold for my little teapot. Next I decided to do a different image for my bold background. I did a penny Black Hedgehog, but it did not look that great with the color combo, So I tried it with a different card back which was this one. But the background turned out so pretty that it seemed a shame to cover it all up, So back to my teapot. And after adding and taking away so many times I ended up with this, and i don't even know if I like it!!!
recipe:
Stamps: Lockhart Teapot, SU Winter Roses sentiment
CS : Chocolate Chip, Old Olive, Pretty pinkish Bazill, Pomegranate, Chatterbox DP
Ink : Wasabi, Moss
Other : copic markers, Prima flowers, May Art ribbon, sequences, SU ribbon, sewing machine, hardware, square scallop punch.
The DP paper and SU ribbon are sewn on. I added Chocolate Chip because I was compelled despite the challenge. Sequences are glued on. Otherwise it is pretty straight forward.
Have a great Tuesday.

Saturday, August 25, 2007

Husbands Birthday

Now I realize that this is not what one would call a masculine card, but believe it or not, my husband really likes these House of Mouse images! When he first saw me going through the catalogue, he came over to investigate, and was getting quite a laugh out of the images. I took this as a good sign seeing that for the most part he doesn't take much interest in my hobby except to admire my work when I request his opinion! So I decided to make him this cupcake image. After I colored it in I realized that Pinkish was the only color to work with it.
Recipe:
Stamps: House of Mouse, SU Itty Bitty Background
CS : Cameo Coral, Close to Cocoa, Confetti, Saffron DP, Au Chocolat DP
Othr : Copic Markers, Faber and Castel pencils, Gamsol, Airbrush tool, Gold brads, May Art Ribbon, blending stubs, stickles.

The image was colored in with Copic markers, and then the frosting was accented with the Faber Castel Color pencils and Gamsol. I then stamped out a second image, colored portions and cut out the pieces that I wanted to raise. The heads and arms of each mouse is raised, a piece of the cupcake, and the candle which is lying down. Before adhering these pieces I created a mask and airbrushed the background. I then adhered the pieces with two thicknesses of dimensional. I used regular glue dots and 1/16" thickness dimensional which are great when you don't want the bulk of regular dimensional. Stickles were used to highlight the cupcake icing and then all the layers were put together. Enjoy and have a great night!

Thursday, August 23, 2007

MFT Thursday

Well now I can do titles, but I can't think of decent titles. So I'm kinda stuck with a obvious kinda lame title. Oh well. Tonight I decided to keep the card clean, No distressing, no ageing, and not to many layers. I figured the image could stand pretty well on its own.
Recipe:
Stamps: My Favorite Things
CS : Sky Blue CS and DP, Real Red, Whisper White, water color paper, Au Chocolat DP
Ink : Memories black die ink, Ranger Adirondacks in Espresso
Other : May art Ribbon, Tombow Markers, SU markers, Spica glitter pens, Silver brads
Its been a while since I have used my markers. I've been so involved with my Copics that I have neglected my watercolor markers shamefully. I really enjoyed not having to work at lightening speeds. I hope you enjoy and have a nice evening.

In Need Of A Good Laugh?

I am sadly unable to post any of the stuff I'm working on tonight as it is due for a contest. But my Husband came across something that when I read it had me laughing hysterically. You have got to check out this Ebay Auction, which the lady writes a little story for. Read the whole description, trust me that it is very funny ebay . Then there is a link to her Blog which though not stamping related is quite a great read. Please check it out and enjoy!!

Tuesday, August 21, 2007

Altered DVD tin

I've done quite a few altered altoid tins, but this is my first time working with a DVD tin. I found it trickier because of the larger size and having to do the inside. I am planning on adding a note pad but so far have not found one the right size! I figured though that since I don't know how long it will take to find one I better post now and then show it again later when I find the pad! It is quite a cute idea and I will definitely keep on playing with DVD tins until I get the hang of it.
Recipe:
stamps: Lockhart Pencils, SU Baroque Motifs, Karen Foster snap stamps mini formal.
CS : Petals and Paisley DP, Rose Red DP, Cool Caribbean, Wasabi
Ink : Ranger Adirondacks Black
Other : Winter Mini ribbon, SEI Brads, Copic markers, Airbrush system, Sewing Machine
The layers are adhered with Crystal Effects. There is sewing along the front cover, The image was colored with co-ordinating Copic markers, then a mask was made and the airbrush applied.
I hope you enjoy my first attempt at Altering DVD tins. Cheers and have a nice day.


Monday, August 20, 2007

I was working today and yesterday on my father's birthday card. Now his birthday isn't until October, but I figured that I could get a bit of a head start on it. I tried to make it masculine, my father loves lighthouses and boats and anything to do with the ocean. I steered clear of ribbon, and tried to bring in the feel of the lighthouse keeper. Warm flannel background, embossing to simulate waves, A life preserver which might be found on his dingy and stitching to give the feel of stitching on a canvas sail. The image is colored with Copic markers and the air brush system. I had a great time with the coloring, and it was my first try doing a sunset with airbrush. It is not perfect, but I am still learning.
Recipe:
Stamps: Karen Lockhart Lighthouse and sentiment, SU Flannel BG, SU By Sea
CS : Night of Navy, Brocade Blue, Bordering Blue, Real Red, Whisper White, Very Vanilla
Other : Embroidery thread, Copper Brad, Cuttlebug swirl embossing folder, Copic Markers, Air
airbrush attachment, Photo corner Quickutz, Piercing tool and mat.
The cross stitch is done by hand, I pierced the paper and then sat and embroidered. I think my husband thinks I'm going loopy. The coloring was thoroughly enjoyable, I played with the shadows and light. I hope you enjoy looking and that you have yourselves a great day.

Friday, August 17, 2007

Stampers Club

One of the biggest things that I struggle with each month is coming up with approachable and nice cards for Stampers Club, Workshops and beginner classes. I love doing my own thing, but a lot of the stuff I do has taken years of practice to achieve and can't be taught to a beginner. Its not that it is hard, just I find intimidating to someone who hasn't stamped before. So the first place I go when I need inspiration for a Class is Andrea's Stamping Blog . She is an absolute wiz at teaching both new and experienced stampers, and she is also my Upline. She has totally mastered simple and elegant which for me is one of the hardest things to do.
This first lady bug card is almost a total case from Andrea's lady bug card .
I just tweaked it a bit and changed some stamps and colors. I used Carte Postal for the background, Pick a Petal for the bug, and Stem sayings for the trail and greeting. Stem sayings is embossed and the colors used are River Rock, Wasabi, Black, Rose Red DP. Ink colors are the same except that I sponged with Caramel.


This next one is showcasing the cracked glass technique. Once again I drew on Adrea for inspiration. I loved this card that she did. I wanted to get the same feel with my own touches. The colors used are Natural, Wasabi, Groovy Guava, Rose Red DP. Ink colors are the same except I added Caramel for sponging. The set used is Pick a Petal.


The last project is a little box that I downloaded from Splitcoast. I used the Very Punny set (because I still have some to sell to customers) and the Pick a Petal for the topper. I accidentally used Pomegranate for the top bug when I should have used red. I didn't have time to fix it but will get my customers to use the red ink to match the ribbon. The bottom bugs are colored with Blender pen and markers.

I thought that I would share this with you so that you can see what i have been up to, but also to give you an idea of my struggles and also the kind of day to day stamping I do for my business.Thanks so much and have a great day!

Thursday, August 16, 2007

Still Coloring


I am a big fan of the House of Mouse images! I find them so whimsical and cute! They recently had a sale where when you buy three you get one free. I decided to add a wee bit to my collection.
recipe:
Stamps: House of Mouse, Lockhart sentiment
Paper : Close to Cocoa, Bashful Blue, Brocade Blue, Whisper White, Basic Grey DP, Unknown
brown.
Ink : Ranger Adirondacks black, Basic Brown
Other : Copic markers, Faber Castel color pencils, Prisma color pencils, Dazzling diamond,
ribbon, copper brads.
To color these images, I usually use a mix of media. In this case i started with a base of Copic markers, in a variety of Earth tones, and Blue greens. There is a touch of the red family used on the cheeks and ears. I then went over all the areas with the color pencils. I use short strokes on the fur to simulate the texture of real fur. I follow the shadow lines using colored pencils in a deeper shade of the same color. I highlighted the toothpaste with glitter. The edges are inked with Ranger Tea dye distress ink using a sponge dabber. A little extra touch of piercing was added to the right corners of the card using Ornare piercing template. I find it adds a little touch of interest.
Thanks so much for your interest, and enjoy!

Wednesday, August 15, 2007

Yup, I'm still Alive!


Where have I been? At the moment I have no idea. I finally went out and got a fancy card reader which will download 200 pictures in about 5 seconds. With that resolved I figured that I would be able to get up to posting on my blog. Then Life caught up with me and I was swamped. I have been frantically trying to prepare for my Friday's Stampers Club, prepare samples for my up-coming Library class, prepare cards and altered objects for a designer contest and basically be busy! Now I know that I have not been posting to any Blogs lately, please don't think that its because I'm not looking! I have been faithfully looking at all you guys daily, its just that with everything on my plate I have been unable to take the time needed to comment (my computer can be really slow sometimes). I will be back to commenting on all the amazing stuff I have been seeing, but until I clear off my desk of necessary projects I will be unable too. Oh ya and on an up note, I'm so excited that Scor-Pal found one of my cards through Beate's challenge and asked to put it in their new gallery! How cool is that. I absolutely love that tool, and now I have something showcased for them!!
As to this card that I made on Saturday. It is fast and was kinda a warm-up. It was really simple but fun. I have always loved coloring, so this was right up my ally.
recipe:
stamps: Lockhart
Paper: drk Brown unknown, Pumpkin Pie, Daisy D DP, Whisper White
Ink : Ranger Adirondacks black, Cool Caribbean, Ranger Distress in Tea Dye and Vintage
Other: Copic Markers (my new favs.), Decorative pearls, May Art ribbon, decorative scissors.
Sakura stardust pen.
I hope you enjoy what you see and i can't wait to show you the more intricate stuff after I enter it in the contest!

Monday, August 13, 2007

I'm back, but can't upload photo's

Ack, believe it or not I'm back, and I've had time to stamp, except that I can't post it. It would seem that either my dear husband or I left the cable that connects the camera to the computer behind. Now I personally can say that I have not touched it the entire trip. I can also say that though I don't know for sure about my husband, I'm inclined to blame him for either mispacking it or leaving it behind somewhere! Therefore as soon as I can a) find it b) buy one or c) have mine mailed to me if it is missing then I am unable to post pictures.
Anyhoo for anyone who is interested in knowing, my vacation was great except for one great flaw..................I could not stamp! I had some great new stamping products, but no where to stamp. My sisters stamp room was under renovations headed by my husband, and her husband. Argggg, talk about miserable timing. My dad's house of course has no stamp room. Well there is no place like home, I can't wait to stamp some more, that means more stuff to upload when we get the darn camera sorted out!

Thursday, July 19, 2007

Tagged and going on vacation


Wow, I'm so excited, I was tagged three times, once by Libby , once By Ana, and once by Karen . I have to say that I admire the work of these three ladies immensely! Libby always has awesome cards, and her Blog is a great place to start for inspiration as well as being chalk full of great photography and interesting stories. Ana is amazingly talented, and I am always envious of nack for putting together amazing color combinations as well as awesome layout and textures. Karen has a great Blog full of fun cards with great elements, one of the favorite being an acetate card. Each of these ladies are talented, creative, and great people to boot. They are all on my multiple daily visit list ( I always hope for multiple postings)
Now I think I'm supposed to nominate other people, but I'm not sure how many? So I will start with:
Andrea Walford . She has a real nack for simple yet elegant cards. I often find for workshops or classes, I get stumped trying to pare down to the basics. Andrea's Blog is always the first I visit for inspiration! I think she has mastered this difficult aspect of stamping - how to make something look great, yet keeping it simple and not to time consuming.
Leslie Miller her cards are always gorgeous and elegant. The lines are clean, and the embellishments are tasteful. everything in her cards seems carefully chosen and to serve the purpose of making a harmonious whole.
Jean She has a lovely Blog with many lovely cards. Everything she makes is beautiful and tasteful. Nothing is over the top but rather fun and approachable.
Well I could probably name tons more people who's work I admire, but I think most everyone has been tagged! As for me I may not be posting until August 12. I am going to visit my sister, and I am not sure if I will have anything to post. She has an awesome stamp room which she will let me run amuck in, but I'm not sure of uploading possibilities!
Thanks so much for your kind and wonderful comments, they are often the highlight of my day!

Tuesday, July 17, 2007

Splitcoast CC123


Well my daughter is back from camp and we are back into the swing of things. On top, my son is setting a crabbiness record lately. I think he is cutting molars, but I'm not sure, all I know is that lately he has been waking up 2-4 times a night, and I'm the one who gets up with him. On top of that he has been quite difficult during the day, chucking his food, whining, throwing tantrums, crying, clinging, and being totally unlike his usual sweet self! So needless to say I am not getting me time till late at night, and now I'm almost to tired to stamp most nights. So that being said, I kept the card simple and fast! I'm also to tired to post most of the details so just click on it and look closely, it's pretty simple.
stamps: Blossoms Abound, Garden Silhouettes, Lockhart sentiment
Paper : Mellow Moss, Night of Navy, Bordering blue, and Artichoke
Ink : same as above + Eggplant, Amethyst, Tea Dye, Old Olive
Acc. : Dazzling Diamonds, silver brads, SU moss and Night of Navy ribbon, Signo Gel Pen, Sakura Stardust pen, Cocoa marker, Marker spritzer tool, corner nipper punch
Thanks so much for visiting, and have a great night!

Monday, July 16, 2007

All my best friends will tell you that I'm a color junkie. I love a well colored card, thus I will often spend half hour or more just on the coloring of the image. Today I was trying to achieve a realistic looking copper. The image is colored with Copic Markers and Prisma pencils. I start by coloring in the varying shades with the markers, and then go back and add detail with pencils. The card itself is very simple, I wanted the image to stand alone.


Sunday, July 15, 2007

Sketch challenge take 2


Well thanks to your helpful comments I figured out how to put a title in.....yay! So no I haven't been trying to figure that out all this time, rather I have been having fun playing with my Copics. It is a real steep learning curve trying to figure it out! I use Copic Ciao and sketch. They are both wonderful, but the sketch offers the option of airbrush. The other thing with these wonderful markers is that paper makes a huge difference. I have had good success with SU whisper White. You want a paper that doesn't absorb the ink right away or you won't be able to blend. So a coating of some sort is essential. Now after all that playing, my card that I'm showing does not use Copics. I will have some stuff to show later this week with the coloring I achieved but for now I decided to post the second card I made for last weeks challenge. The card post below shows my first attempt. I found this to be really interesting with the triangle and the circle. In this card I decided to move the triangle to the corner to make it look a bit different from the other layouts.
recipe:
stamps: Garden Silhouettes, Delight in Life, Paisley BG, PSX wood nymph
paper : River Rock, Always Artichoke, Wasabi, Pomegranate, Old Olive, Garden Green
Ink : Garden Green, Old Olive, River Rock, Tea dye ink
acc : Tombow Markers, SU markers, white signo gel pen, Sakura stardust pen, SU flower
punch from punch box, Prima Rose leaves, Cuttlebug corner embellishment, SEI brad
Ranger liquid pearl medium, Krylon gold leaf pen.
I started by punching out multiple flowers with the Pomegranate. I then used a large embossing ball to depress the centre and dotted three white dots in the centre of each flower. Next I aged my river rock card with its own ink, and placed the Artichoke on top. The Artichoke is stamped with Garden Silhouettes and the images are highlighted with signo and Sakura pens. The circles are Pomegranate and olive on top. The Pomegranate is lined with the Gold Krylon. The circle is sponged with olive and Garden Green ink. The triangle is River Rock stamped with Paisley in Olive and adhered and cut to fit. I painted and cut my image, placed it in centre and placed flowers all around. I then dotted with the liquid pearl . The large flower was stamped, water colored and cut and then reverse embossed and finally adhered. The greeting was done last.
I hope you enjoy your Sunday!

Wednesday, July 11, 2007


Another challenge card today. This time it is SC132. But before I go on could anyone out there tell me how to put a darn title into the post? I don't see any option for typing in a title. Anyhoo, It was a really fun sketch. Circles and triangles. Now I am not well versed in doing even triangles so mine looks a little off. So I have termed my wonky triangle as adding a touch of CHARM and the Human Element!
Stamps: Baroque motifs, Delight in Life, and MFT cow stamp and mini flower.
CS : Chocolate Chip, Apricot, Whisper White, Water color paper, Celery DP, Rose Red DP,
Wasabi, Chatterbox DP
Ink : Wasabi, Walnut die ink, Basic Brown
Acc : Tombow markers ( flowers), Copic Markers ( cow), May art ribbon, unknown ribbon
Copper brads, Gold Krylon Pen, Pop-ups, glue dots, Sakura Star dust pen, Cuttlebug
swirl folder.
I stamped the cow image on Whisper White with the adirondack black ink. I then colored it in with copic markers. It was a real trick blending the larger frame as the ink dries fast and must be blended when wet! I then stamped both flowers on water color paper. They were colored with Tombow markers and then blended with water coloring. After they dried I cut them out, flipped them over and then using a ball tool, I stretched the paper out in order to give it dimension. After each petal was worked, I flipped it over and ran the embossing ball in the centre to press it down and the petals out. Holes were punched and brads added. The celery DP was stamped with the swirl from Baroque Motifs and then sakura Stardust pen was added to the leaves. The circles behind the cow was punched with the mega and giga scallop punch. The triangle is 3 layers. The white was embossed using the swirly Cuttlebug folder, the second triangle is Wild Wasabi and the final is Chatterbox DP. The embossed layer was flipped over and sponged with Wasabi and tea dye. The card was assembled and the flowers were applied with pop-up dots and glue dots in order to layer. Oh ya and gold Krylon was used along the outer edge of the card and Sakura pen is used liberally! Thanks for joining me and have a great day!

Tuesday, July 10, 2007

Well, the picture isn't the greatest, I need to get better lighting for my studio. So anyways this card is for today's color challenge. We were supposed to use Bold Bright turquoise, Real Red, and Green Galore. Now my first thought was Ugg..... and yeech. It's not that I have anything against these colors, They are very beautiful, I especially like the Red and I do use it regularly. My problem was that I rarely use The Green and Turquoise. They just weren't me. But since a challenge isn't always supposed to be easy, I swallowed my trepidation and ploughed ahead. I figure the colors were great for a child so I made A little boys birthday card. I didn't want it to fancy since it would ultimately go to a child. So for the first time I inked up the virgin rubber of this stamp and this is what I got!
recipe:
stamps: By Air, Itty Bitty Background
CS : Turquoise, Green Galore, Real Red, Whisper White, Petal and Paisley DP
Ink : Red, Turquoise, Green Galore, Brilliant Blue, Walnut stain, Tea dye ink
Acc : Real Red ribbon, silver brads, swirl cuttlebug folder, dazzling diamond, Pop-up dots.

this card is very easy the only things that may be hard to see are that the clouds and the plain are cut out and popped up. The swirl of the cuttlebug was sponged with the Walnut ink to simulate a smokey look. Stars and Itty Bitty background is stamped on the main card and everything else is easy peasy.
Have a great Tuesday and I'm off to stamp some more!

Sunday, July 08, 2007


I wanted to do something fun and whimsical today. I have always loved these House of Mouse images very well indeed and alas my own have been gathering dust for some years! I was trying to get a feel of Ana Wohlfart's work. I very much admire her style and skill with layers and colors. Now this doesn't even come close to hers, but I'm hoping that if I keep looking and trying, eventually some of her skill will rub off.

stamps: House of Mouse, Riveting, Itty Bitty Background

CS : Rose Red, Regal Rose, Caramel, Old Olive, Celery dp, Shimmer White CS

Ink : Old Olive, Garden Green, Creamy Caramel, Rose Red, Regal Rose

Acc : Ribbon, AI glitter in Hot Lips, silver brads, scallop trimmer, Prismas and Gamsol, Cuttlebug stitch folder and wildflower folder

The card is very straight forward. Each layer is sponged with its own color, and the caramel and regal rose of the mouse mat is stamped with Itty Bitty. The mouse is colored with Prisma pencils and Gamsol, sections are straight coloring with no blending. The Rose Red strip is embossed with wildflower folder, and the Olive square has the stitch embossing. thanks alot and enjoy the rest of your day!

Saturday, July 07, 2007

Well I've been tagged by Yvette and I am supposed to list 7 little known facts about myself.

1. I am a total computer idiot, would you believe that I just figured out how to add the hyper link so that I doesn't show the whole address? Also I avoided blogging and uploading to splitcoast for so long because I would have to learn how to do it myself. I admit I am intimidated by computers!
2. I love art, painting, coloring and artist materials. I am such a sucker for a new color or medium. I used to do painting and sketching in school and I always have to have some element of art in my life. The joy with stamping is that I can color to my hearts content without worrying if my image is perfect! And as for artist materials, I own water colors, soft pastels, color pencils, alcohol markers, water based markers etc... do you see the problem? I can't stop!
3. Gardening is another one of my loves, but only outdoors. It would seem that I need natures help to water my plants. My husband tells me that I have a green thumb outdoors, but a black thumb indoors. I once managed to kill an Aloe Vera plant.....and that's tough. Somehow I managed to forget about it for 2 years. It was cannibalizing its own leaves for nourishment. When I finally got around to remembering it, I watered it tons and put it in the sun ( it was in a dark corner). I think the shock killed it. Needless to say unless its bouquet, I am not permitted to have indoor plants.
4. I trained a a professional cook at Cordon Bleu and college for management, I have worked in professional French kitchens, and I am now a stay at home mom! I realized as soon as I had kids that it was a terrible profession to have if you want to see your kids grow up!
5. I HATE creamed spinach. As a child I would gag over it, as an adult I still gag over it. I will be open minded to most things......but not creamed spinach..........or raw onions for that matter.
6. I went bungee jumping when my daughter was 1 and 1/2 years old.
7. Even as an adult on my own I was scared to tell my dad that I had got a tiny tattoo on my back. He found out by accident and his reaction still inspires a chuckle in me.

Well now I'm supposed to tag someone else so I pick:
Andrea
Libby
Leslie
hope to see you play along and find out more about you :)

Friday, July 06, 2007


This card was done for Beate's Sketch challenge #9. She calls it the Joy Fold Card. It was a relief to have this sketch because I still feel that I am in the midst of a stamping slump. Lately I am more interested in practicing coloring than making the actual card. I did two cards using this image. The top one for the sketch challenge was done using color pencils. The bottom two cards are colored with Copic markers. I am finally starting to get the hang of these things. It is all a matter of paper. I am currently using SU whisper white to get better blending. So far the top card recipe:
Stamps: SU Baroque Motifs ( I love this set), Lockhart Veggie dress and mini radish
Paper: Hunter, Garden Green, Wasabi, Kraft, River Rock, Saffron DP, Shimmer CS unknown
Ink : Garden Green, Caramel
Acc : Prismacolor pencils, Gold brads, Thyme ribbon and gold cord
This card is shown twice so that you can get a better view of the shimmer CS. It is such a beautiful paper. The image is colored straight with Prismas, NO gamsol. The sentiment is printed from the computer and then punched out with the window punch. The directions for the card can be found on Beate's Website http://beate.blogs.splitcoaststampers.com/2007/07/06/sketch-challenge-9/
Other then that the card is easy.


This next card was the same stamp, but colored with Copic's. As you can see the image is smoother, with less texture, and the colors are somewhat more vibrant. Debbie Olson's tutorial at Thinking Inking http://debbiedesigns.typepad.com/muse_and_amuse/2007/06/strawberries-an.html

was a huge help in achieving good blending. Now I can't wait to get the airbrush tool. the card recipe for this card is as follows:

Stamps: Itty Bitty Backgrounds, Lockhart veggie dress

Paper: Old Olive, Chocolat Chip, Mustard, Whisper White, Hunter, Chatterbox DP

Ink: Same as above

Acc: Copic Markers, White signo Gel pen, Gold eyelets, Sakura Stardust pen, May Art ribbon

The card is pretty easy, and fun to do although I am not sure that I like the placement of the ribbon. As the holes are already cut, i don't have much choice.


Last is the apple card. I am not at all happy with it but thought that i would keep it because I was happy with the coloring of the apples. They are colored with Copic markers. This is also embossed with some old powder that I had kicking around. I just kept adding things to the darn card hoping it would start looking good but unfortunately to no avail!
Today, the last name of the 6 soldiers who died serving their Country was released. I thought that With Canada's day just past, I would take a moment to honour those men and women who have died serving their Country. My heart is with all those who have lost loved ones, both in Canada and the United States. This image represents the fallen soldiers.
This picture is of my Husband as he served in Afghanistan. To say that I am proud of him goes without saying. I am proud that my husband serves his Country. I am proud that my husband puts his life on the line so that others will remain safe at home. I believe that what my husband does is necessary, for without his sacrifice and the sacrifice of all our soldiers, the war on terror could very well come to our doorstep. Without his work the people in these Country's would be forced to forever live under a yoke of oppression and terror, and don't kid yourself, never is it all right to stand by while people are being murdered and terrorized.
Afghanistan was once a beautiful land and in its people, that beauty can be seen. Their faces are often filled with pain, both spiritual and bodily. For those people who want only to live without fear, who want to raise their family in safety with the same benefits that we raise ours in......It is for them that we of NATO re-build.
So that their children can grow up never knowing what it is to be hungry, illiterate or poor, it is for them that we re-build.
So that they can worship a true form of their religion, instead of the Twisted hypocrisy that radicals spout, it is for that, that we fight. For all this and so that our children never experience these things.

I was outraged that at the death of our soldiers, The Opposition ( NDP) rose up and demanded that we pull out our soldiers, that we tell NATO that we will not renew our combat commitment, and finally that we should initiate peace talks with the Taliban! Is the man insane? If he is so eager to negotiate with an enemy that has no concept of peace, then I say may he be the one to lead it with everyone far behind. Thank the Lord we have a Prime Minister who is willing to stick to his guns. May his position be strengthened, and may he forever make wise decisions. Hopefully one day people will realize that all good things come at a price.


Wednesday, July 04, 2007


So for today's challenge I decided on something that had been floating in my head for awhile. The idea was to have them standing sedately in the frame, but they decided to take off on me and run amok. Now I don't know why I feel compelled to give characters personalities but i do. These guy's in my mind are trouble, especially the monkey. So there you have it.
Recipe:
Stamps: Zoofari, Baroque Motifs, Label Classics
CS : Wasabi, Black, Celery DP, non SU shimmer CS
Ink : River Rock, Wasabi, Garden Green, Caramel
Acc. : Sakura Stardust Pen, Stickles, Water color crayons, Window punch, Cuttlebug folder
Wasabi is sponged with its own ink and garden green then embossed with the folder. Shimmer CS is stamped with the flourish ( love it) which was inked with River Rock and Wasabi. Animals were stamped and colored in with crayons, then stickles were applied. Greeting was hand written. Sakura was used to line the embossed circles. Everything was stamped then mounted to black matted shimmer CS which was sponged with caramel and wasabi. Pretty straight forward ,but a fun sketch non the less.

Tuesday, July 03, 2007


Phew, I feel like I am swimming in extra time lately. With my daughter gone to camp, I suddenly have all this free time on my hands. So during my son's nap today, I completed today's color challenge. I used their colors but added some celery as it was in the same family as the Olive.
recipe:
Stamps: Happy Harmony, Linen BG, flower from the Stamp Barn ( Canadian)
CS : Chocolate Chip, Old Olive, Water color Paper, Celery DP
Ink : Old Olive, Chocolate Chip, Celery, Wild Wasabi, Garden Green, Caramel
Acc. : Gold Krylon Pen, Cuttlebug vines, Quickutz buckle, SEI Brad, Organdy ribbon, Scallop
punches, pop up dots, stickles
SU markers: Rose Red, Regal Rose, Pretty in Pink, Blush, Olive, Garden Green, Celery

I decided to do a 3-d flower and stamped it out 5 times. I cut each layer out going with smaller and smaller elements in the design. I water colored with the markers and then punched holes through each flower and put together with brad. I popped a few of the leaves and curled up all the edges then added stickles. The Olive background was sponged with olive and Wasabi and then the linen was stamped in Garden Green. The brown scallop was edged with the gold, and the Vanilla scallop was sponged with caramel. Everything else is easy to see from the picture. Hope you enjoy!

Monday, July 02, 2007


And a partridge in a pear tree. I decided to take this water colored pear off an old card and revamp it into something different. I think I actually really like this card.
recipe:
Stamps: Baroque Motifs, Carte Postal,Lockhart pear and itty bitty Pear
CS : Pomegranate, Sky Blue, Groovy Guava, Very Vanilla, Vellum CS, Black, Shimmer CS
Ink : Blue Bayou, Pomegranate, Groovy Guava, Sky Blue
Acc. : Cuttlebug Textile Folder, silver brads, Tombow markers, Copic markers, stickles,
Sakura Stardust pen, and Sakura blue stardust pen, black organdy ribbon
mat pack and needle.
Once again this is a pretty easy card. The size is 4 1/4 square. The main base is black with Groovy guava and embossed vellum over top. The next layer is black and Pomegranate. There is piercings along the edge. The final layer is Soft Sky on Black. The Sky is stamped with Baroque flourish, and then every flourish is lined with Sakura Blue. The pear platter is popped and colored with marker and water colored. The little pears were colored with Copic, dotted with Sakura Stardust and added to flourishes to make it look like a pear tree. The bird was stamped on shimmer CS and then stickles were added and finally the bird popped.
Well I'm going back to my movie the First Wives Club. So far its really good!
Ciao and have a great Sunday.

Sunday, July 01, 2007


Well, I have been pretty busy since Thursday. Had to get ready for stampers club (go figure I left it to the last minute). Then we were gone Saturday for a party out of town, and finally spent time with my daughter before she had to go back to camp! Phew, finally had time to stamp something with my Zoofari, but when I got it inked up, I became stumped. I honestly had no clue what to stamp, so I went with a simple design to get my self back into the swing of stamping.
Stamps: Zoofari, French Flair, Baroque Motifs
Paper : Black, Soft Sky, Blue Bayou, Rose Red, Shimmer CS
Ink : Blue Bayou, Cool Caribbean, Soft Sky, Rose Red
Acc. : Prismacolor Pencils, SU velvet ribbon, Other ribbon, Silver Brads, Gamsol, Stickles,
Sakura Stardut Pen.
The card is pretty self explanitory, I layered the animals using masking, colored with pencils and gamsol, applied various stickles to ears, grass and spots. I mounted to card which has a layer of Soft Sky stamped with French Flair which was outlined with Sakura Stardust Pen. Flowers were added to corner. Ribbon was put on before image layer.
I know that this is a pretty basic card but you have to forgive me as I am in a blah kinda mood. Hopefully some of this weeks challenges will get my creative juices flowing!
Have a great Sunday.